So along with last weeks YouTube video I thought I’d cover my
terrain that I build for the scenario that Jim and I played. One of the appealing things about Flames of
War is that it is in general a thing that happened. Sure, the stories on the tabletop are amazing
sometimes, but naturally the game lends itself to wanting to recreate events
that really occurred and as such even Battlefront realizes this. Now, in Version 4 they haven’t done much in
the way for campaigns or narrative releases, but in Version 3 they certainly
did and it didn’t take me very long to dig up the Normandy Invasions book.

I was immediately drawn to the scenarios within and very
excited to get one onto my tabletop. I
flipped through them all and settled on Scenario 1 of the book which is Omaha
Beach, specifically because it required the least amount of scenery that I knew
I’d have to be creating and looking at the list of required terrain I would
need the following:
- Roads
- KWK Bunker
- Turreted Bunker
- 4 MG Nests
- 4 AT Gun Nests
- Trench line
- Minefields
- Barbed Wire
- Roadway
- Church
- Crater
- Beach Obstacles
- Higgins Boats
KWK Bunker & MG Nests


These are things that GF9 makes, however again, are
rather pricey for what they are. I mean,
it is just not very difficult to create a bunker or nest of some kind out of
pink insulation foam and that’s what I did here. Simply cutting squares of foam and then
rounding the top edges worked just fine.
Some jabbing with my hobby knife created some nice little pock marks as
though from gunfire or air raids. Using
spare tank turrets/sprue pieces and transport machine guns I was easily able to
create the guns that would sit in the fortifications. I even cut some mosquito netting for camo
nets to hang across the bunkers.
Barbed Wire

For this I took popsicle sticks which I have aplenty and cut
the ends off flat. Drilled a hole at
each end and broke a toothpick off inside gluing it for security. After flocking the stands, I primed and gave
them a rough drybrush to bring up texture.
Finally, I wound jewelers wire around a pen and simply glued the wire to
the toothpicks and popsicle sticks creating 4” sections of barbed wire. Sure, GF9 makes some nice barbed wire, but
their terrain is a little pricy and I needed a lot of barbed wire.
Roads
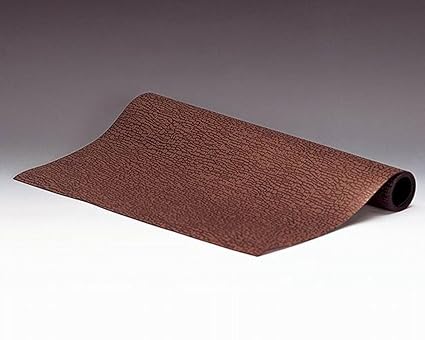
The roadway I’ve had for quite a while, but it was maybe the
best/cheapest solution ever. Finding
this vinyl mat that is usually sold in places like Hobby Lobby, Michaels, Joann
Fabrics, etc… during the holidays to put your little Christmas villages on I
simply cut it into long strips. Well
worth the money.
Crater


These pictures aren’t of me building the actual piece but it
was the same method that I used. Simply
triangles of scrap Styrofoam cut and pasted on to some cardboard and then
covered with wood filler. I should’ve
flocked it with sand but laziness got to me again on this one and so my crater is just painted. There are some very nice commercial crater terrain pieces available and I've been eyeing a few more so because making craters is just time consuming.
Beach Obstacles

Stopping by the local hobby train store I picked up a bunch
of Angle-L plasticard strips from Envirogreen at 4mm for only a
couple dollars. Some simple cutting and
gluing them together resulted in plenty of Czech Hedgehogs and a spray of
silver and a Minwax dip saw those to quick completion.
Higgins Boats

I’m not going to lie here, these are awesome and they are
papercraft. I’m also not so awesome as
to say that I came up with this pattern, but I purchased it from https://www.paperterrain.com/landing-craft/lcm-landing-craft-mechanized. These are totally worth it. I ordered the boats in 20mm scale because
they would mostly fit individual stands and would definitely fit a vehicle or
two. The real motivation though is that
I bought five of these for roughly $15 shipped whereas 3 of the troop carriers
from Battlefront would’ve been closer to $65 after shipping.
The final table

The only thing missing here is those two large back areas are flooded fields. Doesn't seem like trying to make a 2' x 3' piece of water makes sense so I didn't. Also on the back right is a church which I purchased from GF9 because the churches they have available are just stunningly good pieces.
Jim and I had a ton of fun playing this scenario and I think
ideally this is the kind of table I’d like to recreate as an actual table
rather than an amalgamation of random terrains.
I think it would look really cool, and I’ve seen some amazing looking beach
assault tables through Google for the game.
Things I aspire to, but will likely never compare. Still, this should stand as a point that
running a cool beach invasion is not beyond everyone’s reach. Hopefully the post and video inspire you to
go play.
Just in case you haven’t seen the battle report yet, or if
you want to check it out I linked it below.
Comments
Post a Comment